应用环境
网络都由若干设备组成,并且这些设备可能分布在许多地方。为了方便设备维护,在网络中建立网络管理中心,维护人员在网络管理中心就可以对设备进行维护。
为了实现上述功能,需要在路由器上配置Telnet登录,考虑到安全性,登录时要进行本地用户认证。
配置思路
在使用本地用户认证进行Telnet登录时,采用如下的配置思路:
1. 首先保证路由器和网络管理中心的PC机有可达路由。
2. 在路由器上创建本地用户并启用AAA验证。
3. 配置VTY的数量。
4. 保存配置。
配置注意事项
在使能AAA验证后,一定要配置本地用户。
配置实例
组网需求
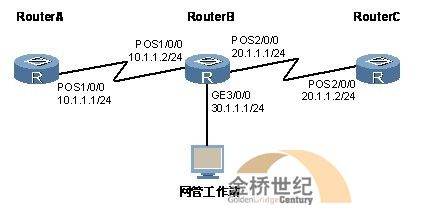
如下图所示,一个公司有三个办公地点,现在用三台路由器RouterA、RouterB和RouterC将三个办公地点的网络连接在一起。RouterB所在的办公地点为公司总部,要求在公司总部建立网络管理中心,集中管理所有的网络设备。
Telnet登录
适用产品和版本
采用NE40E/80E/5000E路由器,版本为(VRP5.10)及后续版本
配置步骤
步骤 1 配置RouterA、RouterB、RouterC三台路由器和网络管理中心网络层互通。
# 配置RouterA
<RouterA> system-view
[RouterA] interface pos 1/0/0
[RouterA-Pos1/0/0] ip address 10.1.1.1 24
[RouterA-Pos1/0/0] quit
[RouterA] ospf
[RouterA-ospf-1] area 0
[RouterA-ospf-1-0.0.0.0] network 10.1.1.0 0.0.0.255
[RouterA-ospf-1-0.0.0.0] quit
[RouterA-ospf-1] quit
# 配置RouterB
<RouterB> system-view
[RouterB] interface pos 1/0/0
[RouterB-Pos1/0/0] ip address 10.1.1.2 24
[RouterB-Pos1/0/0] quit
[RouterB] interface pos2/0/0
[RouterB-Pos2/0/0] ip address 20.1.1.1 24
[RouterB-Pos2/0/0] quit
[RouterB] interface gigabitethernet3/0/0
[RouterB-GigabitEthernet3/0/0] ip address 30.1.1.1 24
[RouterB-GigabitEthernet3/0/0] quit
[RouterB] ospf
[RouterB-ospf-1] area 0
[RouterB-ospf-1-0.0.0.0] network 10.1.1.0 0.0.0.255
[RouterB-ospf-1-0.0.0.0] network 20.1.1.0 0.0.0.255
[RouterB-ospf-1-0.0.0.0] network 30.1.1.0 0.0.0.255
[RouterB-ospf-1-0.0.0.0] quit
[RouterB-ospf-1] quit
# 配置RouterC
<RouterC> system-view
[RouterC] interface pos 2/0/0
[RouterC-Pos2/0/0] ip address 20.1.1.2 24
[RouterC-Pos2/0/0] quit
[RouterC] ospf
[RouterC-ospf-1] area 0
[RouterC-ospf-1-0.0.0.0] network 20.1.1.0 0.0.0.255
[RouterC-ospf-1-0.0.0.0] quit
[RouterC-ospf-1] quit
# 配置网管工作站的IP地址为30.1.1.2/24。
步骤 2 分别在RouterA、RouterB和RouterC上创建本地用户并启用AAA验证。
# 在RouterA上创建用户user1,密码为user1,并启用AAA验证。
[RouterA] aaa
[RouterA-aaa] local-user user1 password cipher user1
[RouterA-aaa] local-user user1 level 3
[RouterA-aaa] quit
[RouterA] user-interface maximum-vty 15
[RouterA] user-interface vty 0 14
[RouterA-ui-vty0-14] authentication-mode aaa
[RouterA-ui-vty0-14] quit
[RouterA] quit
<RouterA> save
# 在RouterB上创建用户user2,密码为user2,并启用AAA验证。
[RouterB] aaa
[RouterB-aaa] local-user user2 password cipher user2
[RouterB-aaa] local-user user1 level 3
[RouterB-aaa] quit
[RouterB] user-interface maximum-vty 15
[RouterB] user-interface vty 0 14
[RouterB-ui-vty0-14] authentication-mode aaa
[RouterB-ui-vty0-14] quit
[RouterB] quit
<RouterB> save
# 在RouterC上创建用户user3,密码为user3,并启用AAA验证。
[RouterC] aaa
[RouterC-aaa] local-user user2 password cipher user2
[RouterC-aaa] local-user user1 level 3
[RouterC-aaa] quit
[RouterC] user-interface maximum-vty 15
[RouterC] user-interface vty 0 14
[RouterC-ui-vty0-14] authentication-mode aaa
[RouterC-ui-vty0-14] quit
[RouterC] quit
<RouterC> save
验证结果
步骤 1 在网管工作站上执行命令telnet 10.1.1.1可以登录到RouterA。
C:\> telnet 10.1.1.1
*********************************************************
* All rights reserved (2000-2005) *
* Without the owner’s prior written consent, *
*no decompiling or reverse-engineering shall be allowed.*
*********************************************************
Login authentication
Username:user1
Password:
Note: The max number of VTY users is 15, and the current number
of VTY users on line is 1.
<Quidway>
步骤 2 在网管工作站上执行命令telnet 30.1.1.1可以登录到RouterB。
步骤 3 在网管工作站上执行命令telnet 20.1.1.2可以登录到RouterC。
配置文件
RouterA的配置文件
#
sysname RouterA
#
interface Pos1/0/0
ip address 10.1.1.1 255.255.255.0
#
ospf 1
area 0.0.0.0
network 10.1.1.0 0.0.0.255
#
return
RouterB的配置文件
#
sysname RouterB
#
interface Pos1/0/0
ip address 10.1.1.2 255.255.255.0
#
interface Pos2/0/0
ip address 20.1.1.1 255.255.255.0
#
interface GigabitEthernet3/0/0
ip address 30.1.1.1 24
#
ospf 1
area 0.0.0.0
network 10.1.1.0 0.0.0.255
network 20.1.1.0 0.0.0.255
network 30.1.1.0 0.0.0.255
#
return
RouterC的配置文件
#
sysname RouterC
#
interface Pos2/0/0
ip address 20.1.1.2 255.255.255.0
#
ospf 1
area 0.0.0.0
network 20.1.1.0 0.0.0.255
#
return
--------------------------------------------------------------------------------